After your grids are prepared, you are now ready for cryo-EM imaging. All cryo-EM grids need to be screened in order to decide whether resources should be committed towards data collection. The ideal grid contains a rich distribution of monodisperse particles that is supported by a thin layer of vitreous ice. In practice, a number of common issues at the sample or grid level can prevent the justification of data collection. This chapter covers best practices in the screening process, starting from a procedural overview of how grids are loaded into the TEM to assessing whether a grid is ready for data acquisition.
At the microscope
Depending on your facility, your microscopes may use either a traditional side-entry or a more modern automatic grid loading system. Regardless of your system, the general principle underlying all grid loading procedures is the same: your vitrified grids must be carefully secured in place and transferred into the microscope while maintaining the grids at cryogenic temperatures.
The following videos provide an overview of a side-entry and autoloading systems. Remember that all tools that come in contact with your grid boxes and grids must first be chilled to liquid nitrogen temperatures, otherwise you risk warming up your grid! Due to the highly technical nature of these procedures and differences between the equipment shown in the videos and your facility, it is important to receive training from your facility manager and work under a supervised setting in order to gain familiarity with your setup.
Side-entry system
Walkthrough of loading a cryo-EM specimen into a side-entry system (Gatan 626 cryo holder, Tecnai T12 shown here).
The side-entry holder and its accompanying workstation are first chilled and equilibrated at cryogenic temperatures. Connect your holder to a temperature probe to verify it is near the boiling point of liquid nitrogen (i.e., about -196°C). A grid box is carefully transferred into the workstation. The box lid is loosened and then a grid is placed onto the tip of the cryo-holder. A clip ring is then secured over the grid and the holder is covered with a shutter to protect the grid from exposure to the surrounding environment. Before inserting the holder into the microscope, check that the airlock has been pre-pumped to preserve the column vacuum.
Auto-loading system
Walkthrough of loading a cryo-EM specimen into an automatic loading system (Titan Krios shown here).
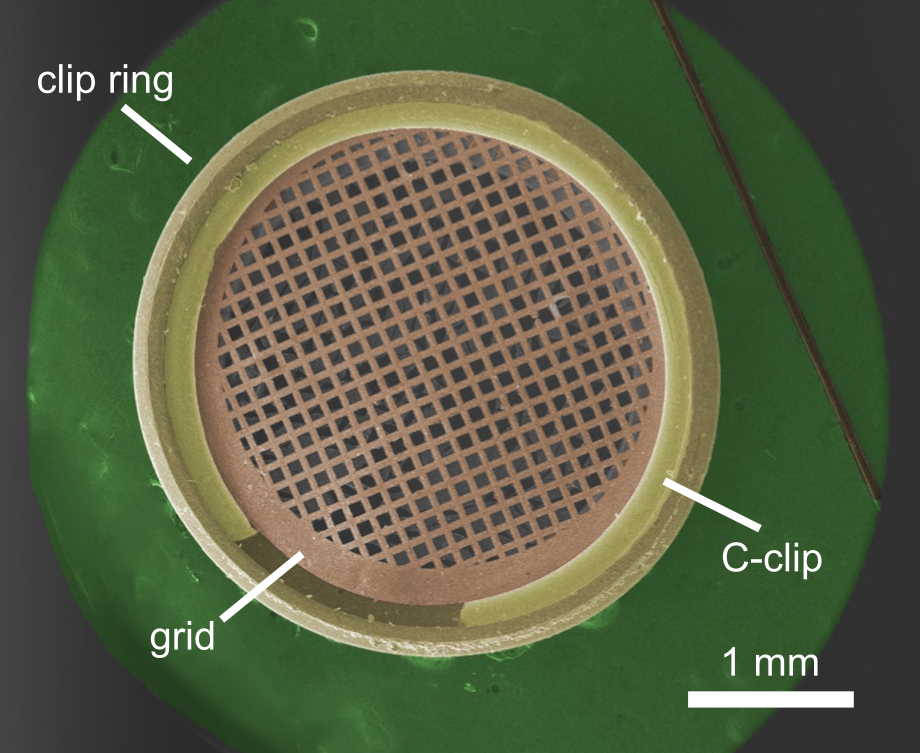
The latest generation of cryo-TEMs use an auto-loading system that offers greater stability over traditional side-entry holders. Autoloaders require grids to be assembled in “auto-grid” cartridges before they are inserted into the microscope. Autogrids are assembled in dedicated workstations by seating cryo-EM grids over a clip ring and then locking the grid and clip ring together with a C-shaped spring, or C-clip. The autogrid is then carefully inserted into one of several slots within the autoloader cassette. Finally, the cassette is loaded into the TEM.
Anatomy of an autogrid cartridge. Scanning electron microscope image of an assembled autogrid cartridge. A strand of hair is shown on the right side of the image as a size reference. (Image credit: Melody Campbell)
Grid evaluation at different magnifications
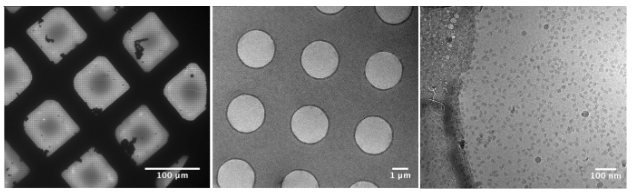
After the cryo-EM sample is successfully inserted into the TEM, the grid is ready for evaluation. During the screening phase, images are typically recorded at a range of magnifications to check for ice and particle quality.
Zooming in on a cryo-EM grid and the types of features that are screened across varying magnifications.
Grid view: Low magnification views of the cryo-EM grid can be extremely informative about the general ice quality of the specimen. At this range, ice that is overly thick will block or obscure views of grid squares. Many vitrified grids will show a gradient of ice thickness.
Square view: Midrange magnification views are useful for confirming ice quality within grid squares. These images can reveal the presence of vitreous or crystalline ice, contamination, and variations in ice thickness.
Hole view: High magnification views are necessary to evaluate the particle itself. The perfect grid will have a rich distribution of mono-disperse particles throughout the hole. If this criterion is not met, then the optimization strategies described in Chapters 1 and 2 should be considered. Note that small particles may only be visible at high defocus levels.
Note that small particles may only be visible at high defocus levels.
Examples of cryo-EM screening images at low to high magnifications. Images recorded on a T12 TEM with a CCD camera.
Cryo-EM Image Gallery
Cryo-EM grids often exhibit a range of ice and particle quality. The following gallery contains many examples of real cryo-EM images that are categorized by common features.
Rich distribution of aldolase particles. Particles are easily visible and are clearly separated.
Rich distribution of aldolase particles. Presence of minor contaminants is tolerable.
Aldolase particles are difficult to identify due to thick ice
Particles are overcrowded and their individual boundaries are difficult to discern.
Field of view is covered with an even distribution of Cdc48 particles. A few contaminating gold particles from the gold grid are a minor concern and do not adversely affect the overall quality of the image.
Cdc48 is barely visible. Low contrast may be due to thick ice or because the image was recorded at low defocus.
A crack within the vitrified hole causes the entire exposed area to move drastically during image acquisition.
A crack within the vitrified hole causes significant movement among the particles within the lower half of the image.
Monodisperse distribution of particles. Some contaminating particles are evident due to size differences, but these will be rejected during downstream image processing.
Crystalline ice is evident by clusters of light and dark reflections within the image. These types of images are not suitable for downstream processing. A zoomed-in view of the dashed box is included in the next image.
Zoomed-in view of crystalline ice. Notice the fine crystalline lattices throughout the image.
Crystalline ice is evident by clusters of light and dark patches within the image.
At higher defocus, specks of dissociated or contaminant proteins are observed throughout the field of view.
The power spectrum of the previous image reveals diagnostic crystalline ice diffraction rings.
Crystalline ice is evident by clusters of light and dark patches within the image.
Field of view is covered with an even distribution of chaperone complexes.
A crack within the ice causes signification movement and blurring.
Field of view is covered with an even distribution of chaperone complexes.
Look closely at the cluster of light and dark patches. You should see fine lattice lines that indicate crystalline ice. A zoomed-in view of the dashed box is included in the next image.
Zoomed-in view of the previous image. Notice the fine crystalline lattices throughout the image. Check the following power spectrum to confirm the presence of crystalline ice.
Although some chaperone complex particles are present, most of the image contains dissociated protein particles and clusters of aggregates.
Although some chaperone complex particles are present, most of the image contains dissociated protein particles and clusters of aggregates.
Although some chaperone complex particles are present, most of the image contains dissociated protein particles and clusters of aggregates.
Rich distribution of a C-shaped E3 ubiquitin ligase.
Rich distribution of a C-shaped E3 ubiquitin ligase.
Rich distribution of a C-shaped E3 ubiquitin ligase. Hole edge is captured at the bottom left of the image.
Monodisperse particles are barely visible. A few clusters of aggregates are scattered throughout the image.
The ice becomes too thin to support the particle towards the lower half of the image. Notice the gradient of ice thickness from thick (dark) to thin (light). Protein denaturation is observed at the transition from thick to thin ice.
The ice becomes too thin to support the particle towards the lower half of the image. Notice the gradient of ice thickness from thick (dark) to thin (light). Protein denaturation is observed at the transition from thick to thin ice. The hole edge is captured at the top of the image.
The ice becomes too thin to support the particle towards the left half of the image. Notice the gradient of ice thickness from thick (dark) to thin (light). Protein denaturation is observed at the transition from thick to thin ice.
In this rather dramatic example, the thin ice is ruptured upon electron exposure.
Monodisperse distribution of PDE6 particles.
Image credit: Image credit: Gulati et al., Sci Adv. 2019 (EMPIAR-10228)
A cluster of clumped up PDE6 particles. Image credit: Gulati et al., Sci Adv. 2019 (EMPIAR-10228)
Vitreous ice may transition into spot-like patches referred to as “leopard” ice. Image credit: Gulati et al., Sci Adv. 2019 (EMPIAR-10228)
Particles are difficult to identify due to thick ice or low defocus. Image credit: Gulati et al., Sci Adv. 2019 (EMPIAR-10228)
Field of view is saturated with monodisperse RNA polymerase particles.
Field of view is saturated with monodisperse RNA polymerase particles.
Large clusters of protein aggregates obscure the image.
Particles are hard to see due to thick ice.
Particles are hard to see due to thick ice.
Field of view is saturated with monodisperse ribosome particles.
Some particle boundaries are difficult to delineate. This sample should probably be diluted just a bit.
Almost half of the image is void of particles. This sample needs to be concentrated.
Relatively few particles in the image. Collecting data on such grids would be a poor use of resources.
High levels of contamination obscure the particles of interest.
Ribosomes are clumped together. These particles would not be suitable for 3D reconstruction.
High levels of contamination dominate this image. Particles also appear to be clumping together.
Particles are hard to see because the image was recorded close to focus. During grid screening, it is advised to use higher defocus settings in order to boost contrast.
Particles appear to be stuck together. Boundaries of individual particles are difficult to delineate.
High levels of contamination and protein aggregation indicate that sample and grid optimization are needed.
The power spectrum of the image reveals diagnostic crystalline ice diffraction rings.
Power spectrum of the previous image clearly shows diagnostic diffraction patterns of crystalline ice.
Summary
The cryo-EM project workflow should be treated as an iterative process that requires going back-and-forth between sample purification, grid preparation, and grid screening. The content covered up to this point explains the most common strategies used to optimize samples and grids and to assess whether a grid is ready for data collection. Almost every sample will require some level of optimization, such as tuning the right concentration of sample or finding the ideal conditions for achieving the best ice. The only way to be sure that grids are suitable for data collection is to screen them using the guidelines discussed in this chapter. After you are convinced you have high-quality grids, you are ready to move on to the next chapter.